

Introduction
In an era where web security is paramount, hosting static websites with HTTPS is essential, especially for internal users. This blog will guide you through setting up an internal HTTPS static website using Amazon S3, an Application Load Balancer (ALB), and AWS PrivateLink. By the end of this post, you’ll understand how to create a secure and efficient infrastructure tailored for internal access.
Architectural Overview
The architecture employs an internal ALB to handle TLS termination for an Amazon S3 bucket. This configuration allows users within a private network to access the static website securely, leveraging AWS Certificate Manager (ACM) for managing SSL/TLS certificates.
Infrastructure Diagram
Here’s an infrastructure diagram illustrating the architecture: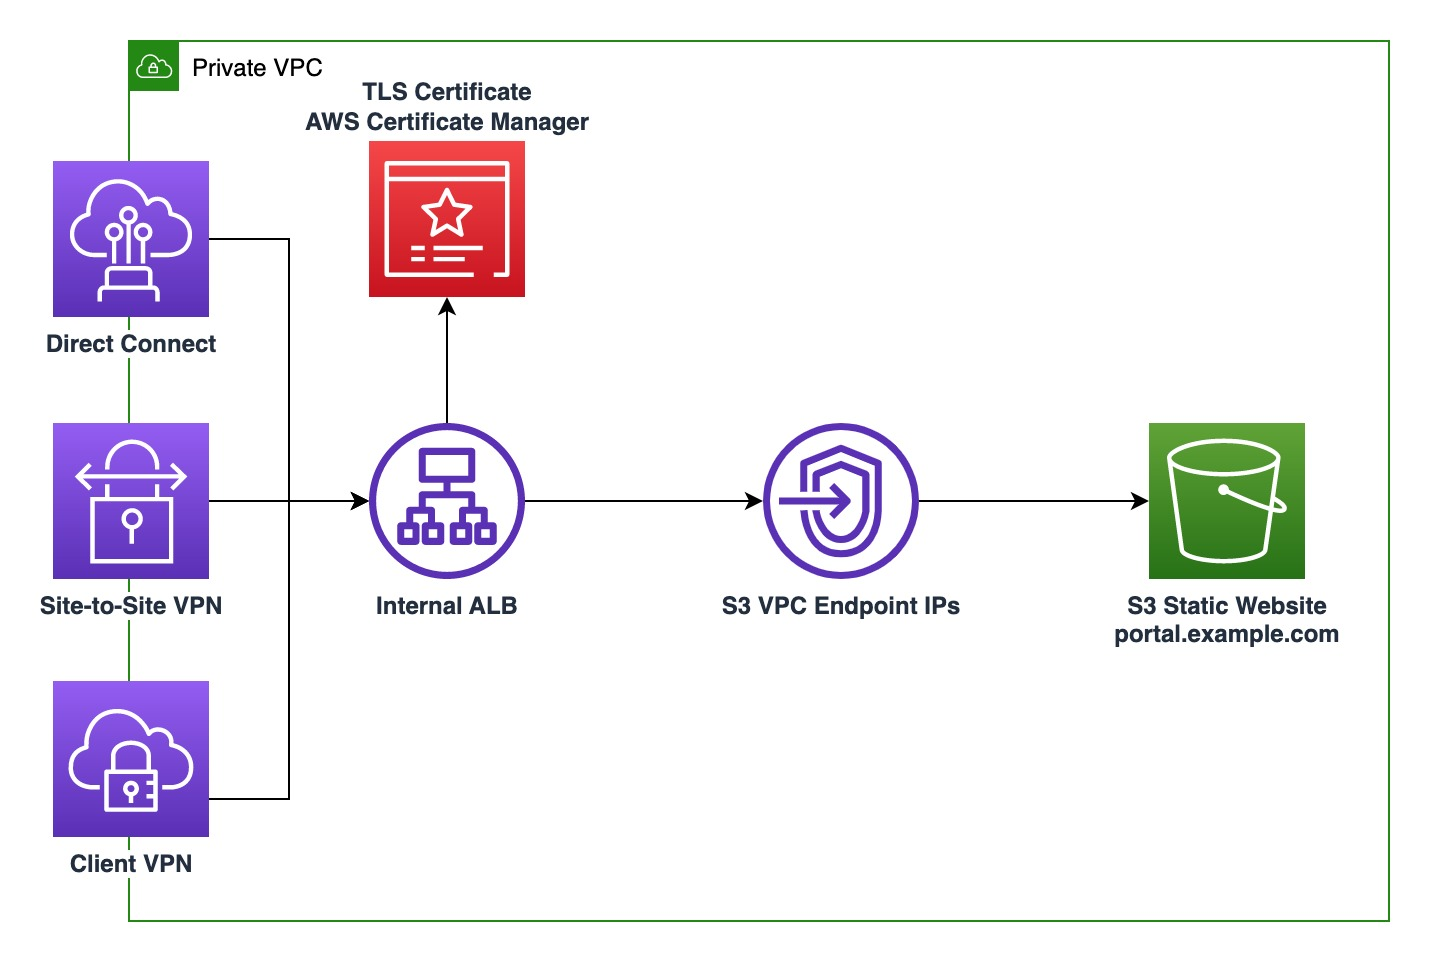
Key Components:
- Amazon S3: Stores the static website content
- Application Load Balancer (ALB): Handles incoming HTTPS requests and forwards them to the S3 bucket
- AWS PrivateLink: Enables private connectivity between VPCs and AWS services without exposing traffic to the public internet
Prerequisites
Before getting started, ensure you have:
- An active AWS account
- A VPC with private subnets
Step-by-Step Implementation
Step 1: Obtain an ACM Certificate
- Navigate to AWS Certificate Manager: Sign in to the AWS Management Console and open the AWS Certificate Manager (ACM)
- Request a New Certificate: Click Request a Certificate, choose Request a Public Certificate, and click Next
- Specify Domain Names:
- Enter the domain name (e.g., portal.example.com)
- Optionally, you can add alternate names (e.g., www.portal.example.com)
- Select Validation Method: Choose DNS validation and click Next
- Add Tags (Optional):
- Add tags to help manage your resources, but this step is optional. Click Next
- Review and Request: Review the information and click Confirm and Request.
- Validate Domain Ownership:
- After requesting the certificate, ACM provides CNAME records that you need to add to your DNS configuration
- Open the Route 53 console, navigate to your hosted zone, and create the provided CNAME records to validate your ownership of the domain
- Wait for Validation:
- Once validated, the certificate will be issued. You will see the status change to Issued in ACM
Step 2: Set Up an S3 Bucket
- Create a New S3 Bucket:
- Go to the S3 console
- Click on Create bucket
- Specify a unique bucket name (it doesn’t have to match your domain)
- Choose the AWS Region for your bucket
- Create the bucket with the default permission settings
- Upload Static Website Files:
- After creating the bucket, open it
- Click on Upload, then drag and drop your static website files (e.g., index.html, style.css, etc.) into the upload window
Step 3: Create a VPC Endpoint for S3
![Create a New Endpoint:
Click on Create Endpoint.
Select Service category as AWS services
In the Service Name search box, type com.amazonaws.[region].s3 (replace [region] with your AWS region)](https://lh7-rt.googleusercontent.com/docsz/AD_4nXe9KNtJL37WMUbobyYXhnYRNlbIy50PpXcekDefeaAb63J9LbSlRe-A7TlWfbTwO1f3m_ZnqBDWkVOLLfCl4ODdtDO8U0Q8szIUo6b35eVAHVPO51WFG4qhsGh2ZZWDLBgOhJvZLyvbCZPK1uLf5YRG-f9g?key=u5GHCZ7jvOjYrlStQ86bAauC)
- Open the VPC Dashboard: Go to the VPC console and click on Endpoints.
- Create a New Endpoint:
- Click on Create Endpoint.
- Select Service category as AWS services
- In the Service Name search box, type com.amazonaws.[region].s3 (replace [region] with your AWS region)
- Configure Endpoint Settings:
- Choose the VPC where your ALB is located
- Select the Interface endpoint type
- Choose the Availability Zones (AZs) where your private subnets are located and select those private subnets
- Set Security Group for the Endpoint:
- Create a new security group or use an existing one for the VPC endpoint. The security group should allow inbound traffic from your ALB’s security group
- Inbound rules:
- Type: HTTPS
- Protocol: TCP
- Port Range: 443
- Source: The security group of your ALB
- Specify Endpoint Policy:
- For the endpoint policy, you can use a policy that allows your ALB to access the S3 bucket securely. An example policy would be:
- For the endpoint policy, you can use a policy that allows your ALB to access the S3 bucket securely. An example policy would be:
{
  "Version": "2012-10-17",

   "Statement": [

      {

         "Effect": "Allow",

         "Principal": "*",

         "Action": "s3:GetObject",

         "Resource": "arn:aws:s3:::yourbucketname/*"

      }

   ]

}- Create the Endpoint: Review your configurations and click Create endpoint
Step 4: Configure the Application Load Balancer
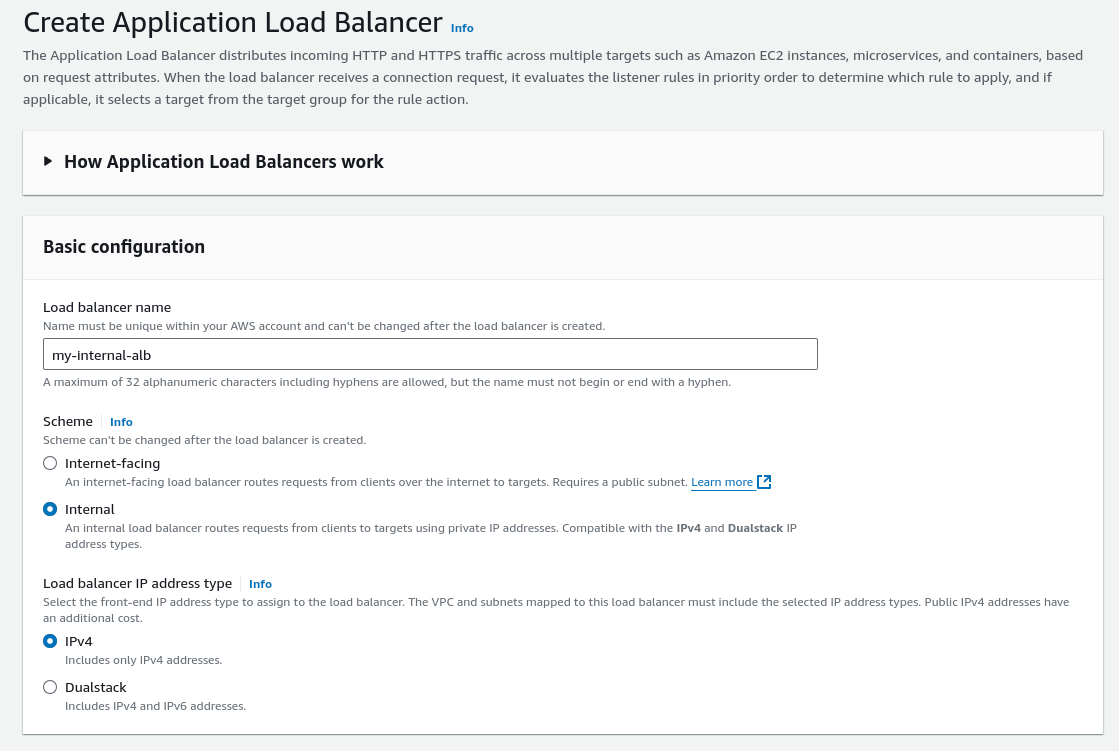
- Create a New Load Balancer:
- Navigate to the EC2 Dashboard and select Load Balancers under the Load Balancing section
- Click on Create Load Balancer and choose Application Load Balancer
- Basic Configuration:
- Select Internal as the Load Balancer type
- Give it a name (e.g., internal-alb)
- Choose the VPC and select the private subnets where you want the ALB to be available
- Configure Listeners and Security Groups:
- Add a listener for HTTPS on port 443
- Choose the SSL certificate you obtained from ACM
- Create or select a security group that allows inbound traffic on port 443 from your internal network
- Inbound rules for the ALB security group:
- Type: HTTPS
- Protocol: TCP
- Port: 443
- Source: CIDR range of your internal network (e.g., 10.0.0.0/16).
- Configure Target Groups:
- Click on Create a new target group
- Set Target type to IP
- Set protocol to HTTPS

- Name the target group (e.g., s3-target-group)
- For Registered Targets, you will register the IP addresses (pt.5) of the Elastic Network Interfaces (ENIs) created for your VPC endpoint
- Use HTTP protocol under the health checks. Under “Advanced Health Check settings”, ensure that the Port Override is set to 80 to match the HTTP protocol
- ALB health checks Host headers will not contain a domain name, so S3 will return a non-200 HTTP response code. Add “307,405” to the health check success codes


- Obtain the IP Addresses for the target group:
- Go to the Endpoints section in the VPC console
- Select your S3 endpoint
- Under the Network Interfaces tab, you will see ENIs listed for each subnet
- Note the private IP addresses from these ENIs as they will be used in the target group
- Register Targets:
- In the target group configuration, add the private IP addresses of the ENIs you noted earlier
- Click Create
- Review and Create:
- Review your settings and click Create to launch the ALB
Step 5: Define S3 Bucket Policy
To restrict access to your S3 bucket:
- Navigate to the Permissions Tab:
- Go back to the S3 console and open your bucket
- Click on the Permissions tab
- Edit Bucket Policy:
- Click on Bucket Policy and add the following policy, replacing yourbucketname and vpce-xxxxxxxxx with your actual bucket name and VPC endpoint ID:
- Click on Bucket Policy and add the following policy, replacing yourbucketname and vpce-xxxxxxxxx with your actual bucket name and VPC endpoint ID:
{

   "Version": "2012-10-17",

   "Statement": [

      {

         "Sid": "AllowVPCEndpoint",

         "Effect": "Allow",

         "Principal": "*",

         "Action": "s3:GetObject",

         "Resource": [

            "arn:aws:s3:::yourbucketname",

            "arn:aws:s3:::yourbucketname/*"

         ],

         "Condition": {

            "StringEquals": {

               "aws:SourceVpce": "vpce-xxxxxxxxx"

            }

         }

      }

   ]

}- Save Changes: Click Save Changes to apply the policy
Step 6: Set Up DNS with Route 53
Utilize Route 53 to create a private hosted zone and configure the DNS records to point to your internal ALB:
- Open Route 53:
- Go to the Route 53 console and click on Hosted zones
- Create a Private Hosted Zone:
- Click on Create hosted zone
- Choose Private Hosted Zone for Amazon VPC
- Enter your domain name (e.g., example.com) and associate it with your VPC
- Click Create hosted zone
- Create DNS Records:
- Click on the created hosted zone
- Click on Create record
- Choose Record type as A – IPv4 address
- For Alias, select Yes, then choose the ALB from the Alias target dropdown
- Set the name to your desired subdomain (e.g., portal.example.com)
- Click Create records
Step 7: Testing the Configuration
To test the setup from an EC2 instance within the VPC:
- Launch an EC2 Instance:
- Launch an EC2 instance in the same VPC and private subnet as the ALB
- SSH to it or use Session Manager
- Access the Static Website:
- Use a browser or curl command to access the static website via the internal domain (e.g., https://portal.example.com)
- You should see your static content served over HTTPS
Conclusion
Following these steps, you’ve successfully set up a secure internal static website hosted on AWS using S3, an internal ALB, and PrivateLink. This setup allows internal users to access the website securely over HTTPS while ensuring traffic does not traverse the public internet.

